Tuesday, January 4, 2011

More Scrap organization

Here is my closest all nice and cleaned out. I was able to free up a bunch of space by moving my paper and paper stacks to my new unit. It's not completely organized yet but at least it's clean and I can walk in :-) PS if you missed my posts before, this is my hall closet which I use for my scrapbook stuff.

This is the view when you open the door. At the top you can see the black paper dividers. I asked for those for Christmas. They hold all my loose patterened paper and my CTMH and SU paper kits. Above that you can see my CTMH stamps. There are three on top and three down the side. What can I say I like stamps :-) Currently I have my punches in an over the dor shoe hanger but I have ran out of room. You can kinda see them on the right of the picture.

Here is the upper part of the closet. At the very top I have my rolling totes and in the corner you'll see my scrapbooks. I have to say most are empty. :-( The pink bag is my tote with my glues and tools etc. The acordian folder looking rainbow is how I keep my scrap pieces of paper. They are organized by color. Again I'm growing out of that as well so I am going to get a small file foler plastic bin and see if that works better. Also, below the shelf which you cant really see is my wireless printer. It's wonderful not to have to have my computer connected and be able to print from another room.

Here is a better view of the whole inside. I have 4 tall and 3 wide of jet max cubes. The brown box was my cricut cake mini!!! Can't wait to use it!!
Here is a close up of my rolling totes. The one on the left is for my E and the black one is for supplies etc for crops.

Here is a better shot of the top of the cubes. There are 6 total CTMH stamp cases full :-) The jars have flowers and buttons, chipboard pieces and Cricut markers. Again the black paper file is Loose patterned paper, SU and CTMH paper kits. All my solid paper and paper stacks are in my ne unit pictured in the post before this one.

I have a few more pics to post later. I havent taken pics of my card organization and my new Cricut book and overlay storage so stay tuned!!

Wednesday, December 29, 2010

My new scrapbook storage unit.

So like most scrapbookers I have a bunch of stuff! I only have a closet so I have over flow of stuff to my dining area. Per my husbands request, we got this unit made to hide all my extra "Scrap crap" :-) I'm so VERY excited. I designed it to hold both my machines and paper!!

Here is the before


 Here is the unit Closed


Here is the Unit on the Expression side with my paper stacks


Here is the Imagine side and my solid paper
This is what it looks like pulled out. I can leave it plugged in and there is enough room for the mat to load. 


Tuesday, December 28, 2010

Twins baby shower invite!

Here are the invites I made for my Co-worker whom is expecting twins. She wanted them very simple and clean. I made 50 total. They are 6x6 and the onesies are cut from New Arrival cartridge at 2 inches then I loaded the cricut marker and outlined them in the orange. The background is embossed with a fiskars embossing plate with baby hands and feet then rubbed lightly with white ink to make them pop a little more. She loved them!!!


Minnie Mouse Banner

I was asked to make a b-day banner for a 2 yr olds birthday. The theme was Minnie Mouse. I used the Mickey Font at 8inches to make the Minnie heads. Each one is 8 inches in width so its a very big banner!!! I cut the bows at 2.50. These pictures were provided from the client on the day of the party. She was very happy with how it tied in the party theme and was big enough for everyone to see.

My Favorite Xmas Card!

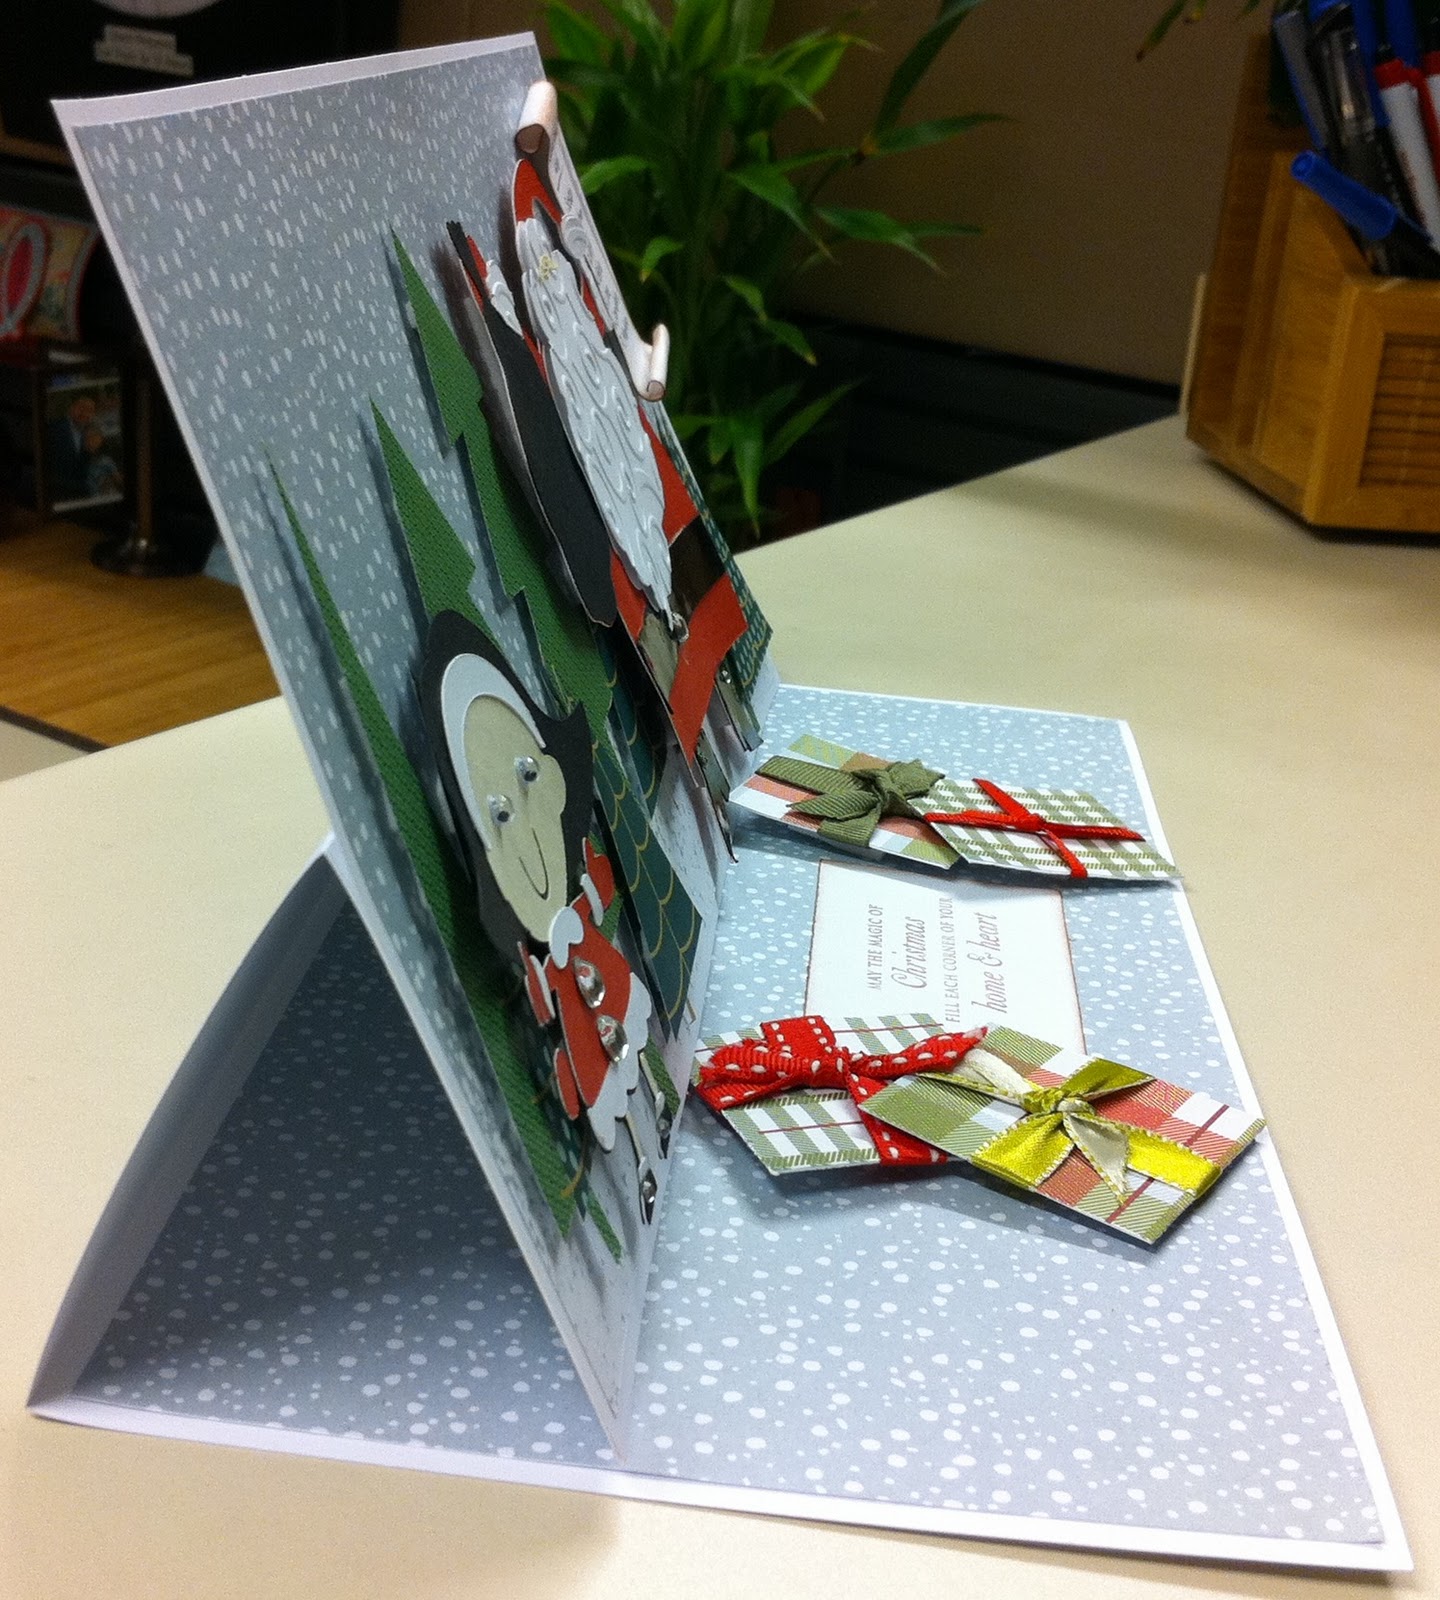
My co worker "REQUESTED" what she wanted her xmas card to look like lol she wanted Santa holding a list with her name on it. So because she was REQUESTING I had to go over the top with it. It measures 6x12!!! She loved it and it's still sitting on her desk lol!! I've included directions at the end as well. Hope you like it!


 This card was made with the new Cricut Lite Jolly Holidays Cricut Cartridge and measures 12x6. Take a piece of white card stock (12x12) and score and fold in half at 6 in. Score the front side only at 3 in. Apply adhesive to only the lower section under the score line. Attach a piece of card stock 12x6 (It is key that you only adhere it to the lower half of the card). Adhere your base paper 11.75 x 5.75. Then adhere your trees using pop dots to add dimension.

Using the Jolly Holidays cartridge, cut out Santa at 5.50 inches and assemble. To add more dimension, cut Santa’s beard twice. Adhere the first cut flat, emboss and pop dot the second layer with the Swirls cuddlebug embossing folder. Cut the little girl at 2.50 inches and assemble. I’ve added extra bling with iRock gems to Santa’s boots and belt as well as the little girls dress. I’ve also added crystal effects to Santa’s belt and boots to make that patten leather look. Pop dot both images and add to the front of the card. I made the list using a small piece of card stock at 1x3 and took the end of my poking tool and wrapped the end of the paper around it to curl the ends of the list. Then add your names and ink your sides.

For the inside, cut and adhere your background paper (11.75 x 5.75). Fold back the front of your card and choose a place which you want your card to stop or stay open. This is where you will place your presents. I made mine with card stock cut at 2x2 and wrapped ribbon around them. Add your greeting and pop dot your presents. It is key to pop dot the presents since this is what will keep your card front open.

Christmas Cards...

I'm really late with posting but I've been REALLY busy! Here are the X-mas cards I made for my co workers.


Wednesday, December 8, 2010

Christmas card 2010

Bold Bright Wishes Christmas
Get custom photo Christmas cards online at Shutterfly.com.
View the entire collection of cards.

Tuesday, November 9, 2010

Cricut Birthday Bash Cartridge

When I first saw the Cricut Birthday Bash cartridge I knew I had to have it. I am cheap however and was waiting to find the best deal. Once I had it in had I feel in love with all the cute little things I can make for all the birthdays I'm asked to make cards for. This is another co-worker bday card and I went with the little bird. The card base is also from birthday bash but I changed it a little. The card base is cut from the card of the "Llama". I used a 12x12 and did fit to page. Once it cut and I folded it, I hated the score cuts so I desided to make a smaller card. I cut the top off where the score cuts are and then I folded it in half to make the card smaller. The rest is cut at 3 1/4 and fits the page perfect. Of course I added LOTS of bling! I wanted to show you the inside but I forgot to take a picture before everyone signed it, so sorry for the "signed" inside pic. Hope you like it! I LOVE this cart!


First Try at T-Shirts and Freezer Paper

I bought some T-shirts for my kids and decided to give it a go on Sunday night. Please remember these are first attempts and I didn't wait and let it dry for a while since my kids were getting impatient (so was Mommy)

The first one I did was the Laker shirt for my DD. I used Cricut Lite - Varsity Letter for the wording and George for the heart. All that is left to do is bling it out.


The second shirt I made for my DS. He wanted a dinosaur so we choose REX for the Cricut Toy Story 3 cartridge. Oh my what was I thinking! LOL It had so many little parts and was so not easy for my 2nd shirt but I made myself finish it. And although its not at all perfect, I think it came out pretty good. Plus it's just a play shirt anyway. So a word of advice, check all the layers before you start painting getting yourself WAY over your head :-)


Thursday, November 4, 2010

Embossed Rose Card

I've really been trying to think outside my comfort zone and design cards that dont look like others I've done. I feel that sometimes you get used to a type of style and although you use different paper, ribbon and punches, the layout maybe the same. So I tried something new with this one. I embossed the Rose with a bronze embossing powder but I added a little green of the mineral powder to it then heat set it. The minerals left a shine to the paper when I shook it off the image. So I went back and rubbed it all over the card. Because it's a mineral, it would rub off so I used hairspray to "set" the shimmer. I then embossed an extra piece of paper and then punched out the corner pieces to match the rose. Also, because of the punched corners (ms punch) I wasn't able to adhere the corners to the matte so when I heat set the rose the corners rolled up but I REALLY like the way it turned out and it gave it good dimention and added to the effect. Hope you like it as much as I do!


R-Rated "Peek a Boo" Bikini Card :-)

So I made this card for again my hubby when someone had just started making them. I added my own little twist to it since it was for my hubby. Instead of glueing the bra down, I have it lift and reveal "girly parts" lol  My husband cracked up laughing. It was the best card ever for him and to this day remains in our room on the wall.

I didn't "SHOW" it in the picture so I do not offened anyone, but if you'd like to see how I have it, shoot me an email I'd be happy to send you the pic.


Anniversary Card

This card I made last year for my hubby. I used everyday paper dolls for the people and the clothes line. It's been a while so I'm nt sure if I used any other cart. The inside is meant to look like my bedroom, down to the green walls and yellow curtains. Hope you like it!


Valentine's Day Card - for DH

I went back and grabed some cards I haven't posted yet. This card I have for theis past Valentines day for my sweet hubby! I swear the magnolia stamps look just like we did when we met 15 years ago freshman year in HIGH SCHOOL!